I’ve been hiking Bukhansan since 1992, and I still remember my first time—I was completely unprepared, wore jeans, and had to borrow a water bottle from a Korean hiker at the top. That embarrassing moment taught me everything I needed to know about proper preparation. These days, I hike Bukhansan at least twice a month, and the mountain never gets old. Whether you’re a hardcore trekker or just looking for a weekend escape from Seoul’s chaos, Bukhansan National Park is your gateway to some of Korea’s most accessible yet rewarding mountain trails.
Located just 30 minutes north of downtown Seoul, Bukhansan is part of a larger protected area called Bukhansan-Suraksan National Park. The park covers 36.73 square kilometers and attracts nearly 4 million visitors annually—more than you’d expect for a Korean mountain. The reason? It offers everything: stunning granite peaks, hidden temples, crystal-clear streams, and trails ranging from family-friendly walks to hardcore summit challenges. The name itself means “Northern Han Mountain,” and it’s been sacred to Koreans for centuries.
After 35 years of exploring these trails, I want to share exactly what I’ve learned: the best routes for different fitness levels, when to go, what gear actually matters, and how to avoid the crowds. Here’s everything you need to know about hiking Bukhansan like a local.
Why Bukhansan Is Perfect for Seoul Visitors
Let me be honest: Bukhansan isn’t a pristine wilderness. On weekends, especially autumn, you’ll be hiking shoulder-to-shoulder with thousands of Seoulites. But that’s precisely what makes it so worthwhile for international visitors. This is where real Koreans spend their leisure time. You’ll see office workers in hiking clubs, families with kids, elderly couples who’ve been doing the same loop for 20 years, and genuine mountain enthusiasts.
The accessibility is unmatched. Unlike more remote Korean mountains (Seoraksan, Jirisan, Chiaksan), you can reach Bukhansan by subway from anywhere in Seoul in 45 minutes max. There are multiple entrance gates, so parking is less chaotic than other popular peaks. The trails are well-maintained—sometimes too well-maintained, with concrete steps and handrails—but this means even inexperienced hikers can tackle serious summits.
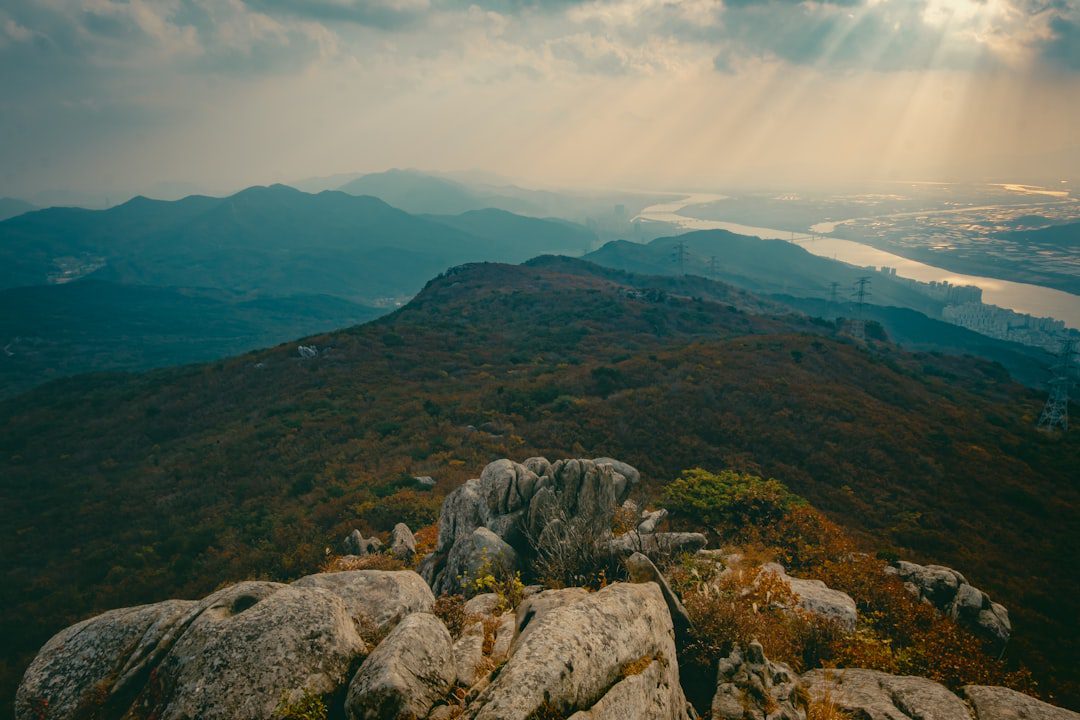
The views are legitimately spectacular. From Bukhansan’s main peaks (Baegundae and Insubong), you can see Seoul’s entire skyline spreading below you—a surreal contrast between urban concrete and natural granite. On clear days, the visibility extends 30+ kilometers. I’ve never tired of that view, even after hundreds of hikes.
Ted’s tip: The best time to visit Bukhansan is early morning on weekdays (Tuesday-Thursday). Weekends, especially October, transform this mountain into a human parking lot. If you go midweek and start before 8 AM, you’ll have the trails almost to yourself.
Getting to Bukhansan from Seoul
By Subway
This is the easiest option if you’re staying in Seoul. The park has six entrance gates, each accessible by different subway lines. Here’s the breakdown:
| Entrance Gate | Nearest Subway | Line/Station | Walk to Gate | Best For |
|---|---|---|---|---|
| Gireum | Gireum Station | Line 4, Exit 3 | 10-15 min | Baegundae, Insubong (Popular) |
| Suyu | Suyu Station | Line 4, Exit 5 | 5-10 min | Easy, Scenic routes |
| Buknaksanpark | Buknaksanpark Station | Line 3, Exit 6 | 15-20 min | Beginner trails, Buddhist temples |
| Hansung University | Gireum or Suyu | Line 4 | 15-20 min | Less crowded routes |
| Sangbong | Gireum or Suyu | Line 4 | 10-15 min | Advanced, wilderness feel |
| Bibong | Jonggno 3-ga Station | Line 1, 3, 5 | 20-25 min | Longer, quieter routes |
My recommendation: Start at Gireum Station (Line 4) for your first visit. Exit 3 takes you directly to the main information center, and this gate provides the quickest access to Bukhansan’s signature peaks. From exit 3, follow signs toward 북한산 입구 (Bukhansan Entrance) for about 10 minutes.
By Car
If you’re renting a car, parking is available at most entrance gates (₩2,000-4,000 per day). However, weekend parking fills up quickly between 9 AM and 3 PM. My advice? Go on a weekday or arrive extremely early. The main parking lot near Gireum Gate holds about 400 cars, but I’ve seen it full by 10 AM on autumn Saturdays.
Ted’s tip: If you’re driving, use Naver Map or Kakao Map (Korea’s most reliable navigation apps) and search “북한산 국립공원” (Bukhansan National Park). The app will guide you directly to the nearest entrance and parking.
The Five Best Trails for Different Fitness Levels
1. Baegundae Peak Trail (Gireum → Baegundae → Insubong)
This is Bukhansan’s most iconic hike and, honestly, the one you should do first. Baegundae means “White Cloud Peak,” and the name is perfect—on misty mornings, the summit seems to float above Seoul. Most people from the Gireum entrance do this loop, which explains why it’s packed on weekends.
Difficulty: Intermediate (3-4 hours round trip)
Distance: 8.4 km
Elevation gain: 730 meters to Baegundae (836m summit)
The route goes: Gireum Gate → Gireum Valley → Baegundae Peak → Insubong Peak → back to Gireum. The first 45 minutes through Gireum Valley are genuinely pleasant—you’ll walk alongside a stream with minimal crowds. Then the real work begins. From about 600 meters elevation, the path becomes a steep staircase (literally, concrete steps) with occasional rock scrambling near the summit.
The payoff: You’re standing on genuine granite, looking down at Seoul. No filter needed—the city sprawls beneath you in an almost overwhelming way. On a clear winter day, you can see Namsan Tower, the Han River, and all the way to Incheon Airport’s runways.
After summiting Baegundae, most people descend directly (making a 5-hour day), but I recommend continuing 20 more minutes to Insubong Peak. It’s slightly lower (810m) but less crowded and offers a different perspective of Seoul’s eastern districts.
| Checkpoint | Distance from Gate | Elevation | Time from Start |
|---|---|---|---|
| Gireum Gate Info Center | 0 km | 110m | 0 min |
| Gireum Valley Stream (scenic spot) | 1.2 km | 280m | 25 min |
| Bullo-bong Pass | 2.6 km | 480m | 50 min |
| Baegundae Peak | 4.2 km | 836m | 1h 45min |
| Insubong Peak | 4.8 km | 810m | 2h 10min |
| Return to Gireum Gate | 8.4 km (round trip) | 110m | 4h total |
Crowds and timing: On a Saturday in October, expect 5,000+ hikers on this trail. Go on a weekday morning instead. I did this hike on a Tuesday at 7 AM last month and only saw about 20 people the entire time.
Facilities: The Gireum Gate info center (open 9 AM-5 PM, closed Mondays) has clean bathrooms, water fountains, and a small café. There’s no food or water on the mountain itself, so bring enough.
2. Suyu Valley Trail (Suyu Gate → Bibong Peak → Seoulsul Peak)
Difficulty: Easy to Moderate (2.5-3.5 hours)
Distance: 6.1 km
Elevation gain: 500 meters
If Baegundae feels too overwhelming, Suyu Valley is your answer. This is where I bring friends who’ve never hiked before. The trail follows a gorgeous stream for the first half—genuinely peaceful—and the final summit push is steep but achievable for anyone in reasonable shape.
Starting from Suyu Station (Line 4, Exit 5), it’s only a 5-minute walk to the gate. The trail climbs alongside Suyu Stream, and the gradient is steady but not brutal. You’ll see waterfalls, granite formations, and moss-covered rocks. The final push to Bibong Peak (583m) takes about 1.5 hours and involves rock scrambling, but nothing technical.
Most people turn around at Bibong, but I recommend continuing to Seoulsul Peak (533m) for a slightly different return route. It’s only 20 extra minutes and offers panoramic views of the northern valleys.
Ted’s tip: Suyu is less crowded than Gireum because fewer tourists know about it. Weekdays, you might see only 100-200 hikers total. Bring a water bottle—the stream is gorgeous but you shouldn’t drink directly from it.
3. Buknaksanpark Temple Trail (Buknaksanpark Gate → Bulgapmun Hermitage → Easy Loop)
Difficulty: Easy (2-3 hours)
Distance: 4.8 km
Elevation gain: 300 meters
This trail is often overlooked, which makes it a hidden gem. Instead of chasing summits, you hike through forest to a beautiful Buddhist hermitage called Bulgapmun, visit a small waterfall, and experience Bukhansan’s spiritual side. It’s perfect if you want hiking without the competitive summit-racing vibe.
The entrance near Buknaksanpark Station (Line 3) is quieter than Gireum or Suyu. The first section is gentle forest walking alongside a stream. After about 45 minutes, you reach Bulgapmun Hermitage, a small temple hidden in the trees. If you’re respectful, you can explore the grounds, see the temple buildings, and enjoy the peaceful atmosphere.
From here, you can continue to a small waterfall (15 more minutes) or make a loop back through the forest. This route suits families or anyone prioritizing scenery and serenity over elevation gain.
Admission: Free. The hermitage accepts donations (₩1,000-5,000) if you want to support the monks.
4. Sangbong Peak Trail (Hansung University Gate → Sangbong → Ridge Walk)
Difficulty: Advanced (4-5 hours)
Distance: 9.2 km
Elevation gain: 800 meters
Once you’ve done Baegundae and want something harder, Sangbong Peak delivers. Starting from Hansung University Gate (quieter than Gireum), this trail climbs steeply through forest and then follows the ridge spine of Bukhansan’s north side. The views are wilder, less Seoul-centric, and the atmosphere feels genuinely remote despite being so close to the city.
The path is technical in places—rock scrambling, exposed sections—but well-marked. Sangbong Peak (771m) is less visited than Baegundae, so you’ll have space to breathe at the top. Many hikers continue along the ridge to connect with other peaks, making this an option for experienced walkers wanting a full-day adventure.
Ted’s tip: Bring trekking poles for this one. The descent is knee-punishing without them, especially if you’ve done a long ridge walk. I always carry poles for Sangbong.
5. Jonggno Gate “Backdoor” Route (Bibong Peak, Less Crowded)
Difficulty: Moderate (3-4 hours)
Distance: 7.8 km
Elevation gain: 600 meters
If you want to avoid the Baegundae crowds entirely, the Bibong route from Jonggno 3-ga Station (surprisingly, a central Seoul location) is your answer. This trailhead is actually on the southern side of Bukhansan, making it feel like a different mountain even though you’re visiting the same park.
The trail climbs more gradually than Gireum and approaches Bibong Peak (799m) from the south. The vistas are genuinely spectacular—you see Seoul’s southern districts instead of the northern sprawl. The path feels less “industrialized” with fewer concrete steps and more natural terrain.
Getting there: From Jonggno 3-ga Station (Lines 1, 3, 5), Exit 5, walk 20-25 minutes following signs toward 북한산 (Bukhansan). It’s a bit of a schlep from the station, but worth it for the solitude.
What to Bring: The Essential Gear List
I learned through mistakes. Here’s what actually matters for Bukhansan:
| Item | Why It Matters | Estimated Cost in Korea | Where to Buy |
|---|---|---|---|
| Water (1.5-2L) | No water on trails; dehydration is common | ₩3,000-5,000 | Convenience stores near subway |
| Snacks (energy bars, fruit) | You’ll need calories for 4+ hours of climbing | ₩5,000-15,000 | CU, GS25, Emart24 |
| Hiking boots (good ankle support) | Granite is slippery; bad ankles = misery | ₩80,000-200,000 | Sports shops (Decathlon, local brands) |
| Trekking poles | Knee pain is real; poles prevent it | ₩40,000-100,000 | Decathlon, sporting goods stores |
| Sun protection (SPF 50+) | High elevation + granite reflection = brutal sun | ₩8,000-20,000 | Any convenience store, pharmacies |
| Hat or cap | Essential; sun and wind at summits are intense | ₩15,000-40,000 | Outdoor shops, department stores |
| Lightweight jacket | Temperature drops ~6°C per 1,000m elevation | ₩50,000-150,000 | Outdoor brands, Decathlon |
| Blister kit, pain relievers, bandages | Descent hurts; blisters happen | ₩10,000 | Pharmacies (약국) |
Ted’s tip: Don’t buy expensive hiking gear just for Bukhansan. But DO invest in good boots. I see tourists in running shoes every weekend, and they regret it by kilometer 3. One decent pair of hiking boots (₩80,000-120,000) will last years.
For gear shopping in Seoul, Decathlon stores are your best bet. They have branches in Itaewon, Gangnam, Dongdaemun, and other locations. Prices are reasonable and staff are helpful. You can also check popular Korean outdoor brands like Kolon Sport, Hi-Gear, and Coni.
Seasonal Considerations
What you bring changes dramatically by season:
| Season | Best Months | Temperature Range | Key Considerations | Crowds |
|---|---|---|---|---|
| Spring | April-May | 10-20°C | Wildflowers, variable weather, possible rain | Moderate-High |
| Summer | June-August | 22-30°C (hot!) | Mosquitoes, humidity, need extra water | High |
| Autumn | Sept-Nov | 5-18°C | Perfect conditions, stunning foliage | EXTREME |
| Winter | Dec-Feb | -5 to 5°C | Icy rocks, need microspikes, fewer crowds | Very Low |
Real talk about autumn: October is absolutely beautiful—the foliage is peak, temperatures are perfect, and visibility is excellent. But it’s insanely crowded. I saw 8,000+ people on the Baegundae trail one October Saturday. If you visit then, accept the crowds or go on a weekday. Alternatively, visit other Korean mountains that are equally stunning but less famous.
Practical Tips: Hours, Fees & What to Expect
Operating Hours & Seasons
Bukhansan is technically open year-round, but there are restrictions:
| Season | Dates | Daily Hours | Notes |
|---|---|---|---|
| High Season | Mar-Oct | 5 AM – 6 PM | Normal operations; gates fully staffed |
| Low Season | Nov-Feb | 5 AM – 5 PM | Reduced services; fewer facilities open |
| Early morning entry | Year-round | From 5 AM | Before 5 AM requires registering at info center |
| Closure days | Mondays | Info centers closed | Trails still accessible; no facilities |
Entrance Fees
Admission is completely free. No tickets, no permits, no hidden charges. This is one of Korea’s greatest deals. Just show up and hike. The park is maintained through government funding.
Facilities at Each Gate
| Gate | Restrooms | Water Fountain | Café | Info Center Hours |
|---|---|---|---|---|
| Gireum | Yes (clean) | Yes, multiple | Yes, basic menu | 9 AM – 5 PM (closed Mon) |
| Suyu | Yes | Yes | Small shop | 9 AM – 5 PM (closed Mon) |
| Buknaksanpark | Yes | Yes | No | 9 AM – 5 PM (closed Mon) |
| Sangbong | Basic | Yes | No | 10 AM – 4 PM (closed Mon) |
| Jonggno (Bibong) | Yes | Yes | No | 9 AM – 5 PM (closed Mon) |
Ted’s tip: Visit the Gireum Gate info center before your hike. Staff can recommend routes based on your fitness level, provide free detailed maps, and answer specific questions. They speak some English and are genuinely helpful.
Safety, Rules & Etiquette
Official Park Rules
These aren’t optional:
- Stay on marked trails. No bushwhacking. The mountain is protected and off-trail hiking damages vegetation and increases wildfire risk.
- No camping. The park is a day-hiking-only zone. All gates close at dusk.
- No drones. They’re explicitly banned.
- Leash your dog. Yes, Koreans bring dogs. They need leashes. Some sections are dog-free.
- Take all trash. Leave nothing behind. This isn’t optional—Koreans are serious about it.
- Don’t leave the trail for selfies. People die doing this. I’m not being dramatic.
Real Safety Hazards
After 35 years, here’s what actually worries me:
Slippery granite: Those beautiful gray rocks are slick when wet. Even when dry, smooth granite is treacherous. Descending is where injuries happen. Use poles.
Overcrowding: On busy days, the summit gets dangerously packed. People push, equipment fails, and accidents happen. Go weekdays or accept the risk.
Getting lost: This is rare on marked trails, but the rock formations look similar. Take clear photos of trail junctions. Download offline maps on your phone.
Altitude-related issues: Bukhansan isn’t high (max 836m), but steep elevation gain in 2-3 hours can affect people unaccustomed to exercise. Take breaks. Drink water constantly. Don’t be proud.
Weather: Conditions change fast. A cloudy morning can become visibility of 20 meters by noon. Temperatures drop as you climb. Bring weather protection even if the forecast looks perfect.
Emergency response: Cell service is spotty on certain ridges. The Korean rescue service (119) is excellent and free, but it’s better not to need them. Tell someone your route and expected return time.
Ted’s tip: If you’re uncomfortable, turn back. I’ve seen people push too hard and end up needing rescue because they were embarrassed to admit they couldn’t do it. Pride causes accidents. The mountain will be there tomorrow.
Korean Hiking Etiquette
These aren’t rules, but they matter:
- Yield to uphill hikers. If someone is struggling uphill and you’re going down, step aside. This is deeply ingrained in Korean culture.
- Don’t block trails for photos. Take your picture, then move. Don’t camp at scenic spots.
- No loud music or speakers. Headphones are okay; portable speakers absolutely aren’t.
- Respect temple areas. If you encounter monks or hermitages, be quiet and respectful. Remove your shoes if asked.
- No spitting, smoking near others. These are considered rude even though some people do it.
- Acknowledge other hikers. A simple nod or “안녕하세요” (hello) is appreciated. Koreans are friendlier on mountains than in the subway.
Best Times to Visit & Crowd Management
Time of Day
This matters more than you think:
| Start Time | Crowd Level | Light Quality | Best For |
|---|---|---|---|
| 5-7 AM | Virtually none | Golden morning light; misty valleys | Serious hikers, photography, solitude |
| 7-9 AM | Light | Perfect clarity | Most visitors—my recommendation |
| 9 AM – 12 PM | Heavy | Harsh midday sun | Avoid if possible |
| 12-2 PM | PEAK (chaotic) | Haze, poor visibility | Never choose this time |
| 2-5 PM | Moderate-Heavy | Afternoon light, descent shadows | If you start late, at least finish before dark |
My strategy: I hike Bukhansan, I leave my hotel by 6 AM, aim to be on the trail by 7 AM, summit by 9-10 AM, and descend by early afternoon. By 1 PM, I’m off the mountain while everyone else is arriving. This single adjustment transforms your experience.
Day of Week
Weekdays (Tue-Thu): 60-80% fewer people. Genuinely peaceful. Your first choice.
Fridays: Increasing crowds as weekenders arrive. Still manageable if you go early.
Saturdays & Sundays: Assume peak crowds. The mountain is at capacity. Go only if you’re okay with hiking in crowds.
Mondays: Officially quiet, but info centers close so fewer facilities.
Seasons to Avoid
October is objectively the best hiking month in Korea—perfect weather, stunning foliage. It’s also when 100,000+ people hit Bukhansan. If you go in October, accept crowds or visit on a Tuesday.
Summer is hot, humid, and buggy. Not my preference. Spring is excellent (April-May) but increasingly crowded.
Winter is actually my favorite for serious hikers—hardly anyone goes, snow/ice makes it technical, and views are clearest. But you need winter-specific gear (microspikes at minimum).
Ted’s tip: If you’re visiting Seoul for just a few days and can’t choose your hiking date, go anyway. A crowded Bukhansan hike is still amazing. Just manage expectations—wear headphones, embrace the social experience, and find your moment of peace somewhere on the trail.
After Your Hike: Recovery & Local Eats
You’ve crushed a Bukhansan hike. Your legs are shaking. What now?
Most hiking areas in Korea have “mountain restaurants” (산채기 식당 or 산채정) near the entrance gates. These serve traditional hiking food: spicy ramyeon, kimbap (Korean sushi), and grilled fish. They’re casual, cheap (₩8,000-15,000), and exactly what you need.
Near Gireum Station, there are several decent options within walking distance of the gate. The most popular is a small spot called “Bukhansan Hanaro” (북한산 한아로), but honestly, any restaurant near the gates serves similar food.
My recommendation: Grab a cold drink from a convenience store (GS25 or CU at Gireum Station) and relax there before taking the subway back to your hotel. Your legs will thank you for not rushing.
If you want something more upscale after your hike, head to Yeonnam-dong or Seongsu-dong (both accessible via Line 4 after exiting at Gireum). These neighborhoods have excellent cafes and restaurants perfect for post-hike meals.
For authentic Korean recovery food, consider trying a full Korean breakfast the next morning—your muscles will recover better with quality protein and carbs.
Frequently Asked Questions
How long does it take to hike Bukhansan?
It depends on your route. The classic Baegundae hike from Gireum is 4-5 hours round trip including summit time. Suyu Valley is 3-3.5 hours. Sangbong Peak is 4.5-5.5 hours. Most people underestimate, so add 30 minutes to whatever the guidebook says—especially for descent.
Do I need a guide?
No. The trails are well-marked with signs in Korean and English. However, if you’re inexperienced or prefer group hikes, several companies offer guided Bukhansan tours. Search “Bukhansan guided tour” on Korean tour sites. Costs run ₩50,000-80,000 per person.
Can I bring my dog?
Yes, but with restrictions. Dogs must be leashed at all times. Some sections, especially around temples, are dog-free zones. Ask at the info center which routes are dog-friendly. Most Koreans do bring their dogs—it’s totally normal.
What if I’m really out of shape?
Start with the Suyu Valley trail or the Buknaksanpark temple route. Both are achievable for people with minimal fitness. If those feel impossible, consider Namsan Tower or easier Seoul walks instead. No shame—Bukhansan will still be there when you’re ready.
Is Bukhansan safe for solo travelers?
Completely safe for solo hiking. The trails are busy, well-maintained, and regularly patrolled by park rangers. If you’re a solo female traveler specifically, see our guide on solo female travel in Korea for context, but Bukhansan is genuinely welcoming and secure.
What happens if weather turns bad while I’m hiking?
Descend immediately. Lighting strikes occur on Korean mountains. If you’re near a summit when storms approach, don’t try to summit—turn back instead. The views will wait. All gates have evacuation routes and rangers monitor weather. If visibility gets dangerously low (under 30 meters), visibility-impaired hikers often use the guide ropes installed on steep sections to descend safely.
Can I take the same route down that I took up?
Yes, always. All Bukhansan trails are out-and-back routes or loops where you return via the same path. There aren’t shuttle systems or one-way routes. This matters for logistics—budget time to return to your starting point.
How do I get high-quality photos at the summit?
Arrive early to avoid crowds in your photos. Early morning (6-8 AM) offers golden light and fewer people. Position yourself away from the selfie stick crowds—walk 50 meters along the ridge for solitude. Bring a small tripod if you want self-portraits. The view speaks for itself—usually, the best photos come from simple compositions with Seoul visible below.
Final Thoughts
Bukhansan isn’t the most impressive mountain in Korea. Higher peaks exist. More remote wilderness areas exist. But Bukhansan is special because it’s yours if you’re in Seoul—yours to access in 45 minutes from the city center, yours to summit before lunch, yours to escape urban chaos and touch something real.
I’ve hiked Bukhansan hundreds of times across three and a half decades. The mountain has changed—more crowds, better trails, more facilities. But the core experience remains: granite beneath your feet, Seoul’s skyline sprawling beneath you, and that moment on the summit when your mind stops thinking about email and work and just exists in that landscape.
My advice? Go on a Tuesday morning. Bring water, good boots, and a journal. Hike one of these trails. Sit at the summit for 20 minutes in silence. Descend thoughtfully. Grab something warm to drink. You’ll understand why 4 million people a year choose Bukhansan. The mountain is waiting.
— Ted K
Image Credits: Photos sourced from Unsplash. By using this site, you agree to our Privacy Policy and Disclaimer.