I first hiked Bukhansan in 1991, fresh off the plane from Toronto, with absolutely no idea what I was doing. I wore jeans. Actual jeans. My Korean coworker didn’t even try to hide her concern as we started the trail—and by kilometer two, my thighs were screaming. But somewhere around hour three, as the ridge opened up and I could see Seoul sprawling below us like a circuit board, I understood why this mountain would become my sanctuary for the next 35 years.
Bukhansan National Park sits just north of Seoul’s busiest neighborhoods, and it’s genuinely one of Asia’s most well-maintained mountain destinations. I’ve hiked the Canadian Rockies, the Swiss Alps, and most of Korea’s major peaks, and I can tell you with certainty: Bukhansan is special. It’s accessible enough for first-timers but challenging enough to keep experienced hikers coming back. The infrastructure is impeccable—well-marked trails, ranger stations, emergency services—yet it still feels wild and remote.
Whether you’re visiting Seoul for a few days or you’re a resident looking for a weekend escape, this guide will give you everything you need to experience Bukhansan like a local. I’m sharing the trails I’ve hiked hundreds of times, the mistakes I’ve watched tourists make, and the insider details that’ll make your day unforgettable.
What Is Bukhansan National Park?
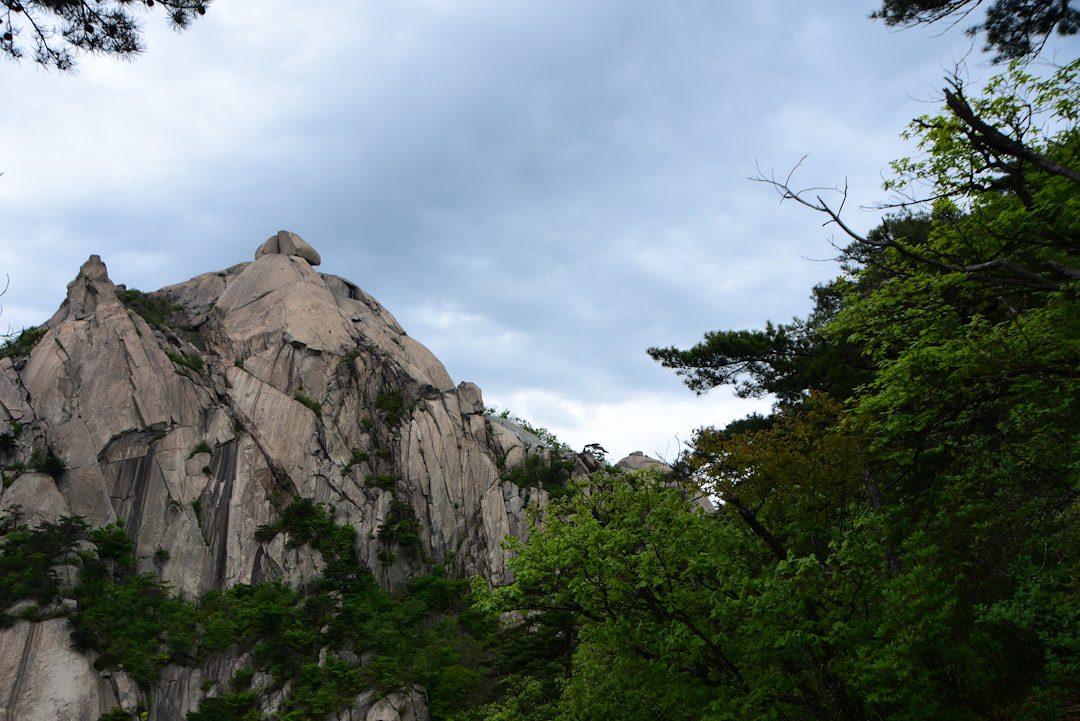
Bukhansan (북한산) translates to “north Han mountain,” and it’s one of South Korea’s most visited national parks—not because it’s the tallest or most dramatic, but because it’s right there, practically within Seoul’s administrative boundaries. The park covers about 80 square kilometers, with Baegundae Peak being the crown jewel at 836 meters. That might not sound impressive compared to, say, Mount Rainier, but here’s the thing: you’re not gaining elevation gradually. You’re doing a brutal rock scramble where your hands touch stone, and the views are genuinely spectacular.
The park has been attracting hikers since the 1930s, but it really exploded in popularity after the Korean War ended. Now, on weekends, you might encounter 5,000+ hikers on the main trails. I’m not exaggerating. On a Saturday in spring, the peak route can feel like Seoul’s Myeongdong shopping district, but vertical.
Ted’s tip: Visit on a weekday if possible. Tuesday or Wednesday mornings are absolute magic—you’ll have sections of trail entirely to yourself, and you’ll actually hear the forest instead of the chatter of crowds.
The park operates year-round, and the landscape transforms dramatically with the seasons. Spring brings wildflowers and mountain streams swollen with snowmelt. Summer is lush but humid. Autumn is the busiest season because the foliage is breathtaking (I’ve written a full guide to autumn colors in Korea). Winter transforms Bukhansan into a snow-covered wonderland, but trails get icy and dangerous—definitely not recommended for beginners.
Getting to Bukhansan: Subway & Transportation
Bukhansan has three main entry points, each accessible by Seoul subway. This is genuinely one of the best parts about hiking here—there’s no complicated bus ride or rental car nonsense. You can be on the trail 30 minutes after getting off work.
| Entry Point | Subway Access | Distance from Station | Best For |
|---|---|---|---|
| Gireum (기름) | Line 1, Exit 1 | 10 min walk | Baegundae Peak route |
| Suyu (수유) | Line 4, Exit 1 | 15 min walk | Eastern trails, Neunggol |
| Bullamsa (불암사) | Line 3, Exit 4 | 20 min walk | Beginner trails, temple area |
From Gireum Station (기름역): This is the most popular gateway, and for good reason. Exit at Exit 1, then follow the small roads heading north. You’ll pass convenience stores and a few restaurants. The hike from the station to the actual trail entrance is about a 10-minute walk, and it’s mostly flat. Once you reach the park entrance, there’s a ranger station where you can grab water and ask for current trail conditions.
From Suyu Station (수유역): This is where I usually go when I want to avoid the Gireum crowds. It’s slightly quieter and accesses some beautiful eastern routes that fewer tourists know about. The walk from the station is a bit longer (15 minutes), and there’s a steeper climb through a residential area, but it’s worth it.
From Bullamsa Station (불암사역): This entrance is ideal for families or people with limited hiking experience. The trails here are shorter, and there’s an actual temple (Bullamsa Temple) you can visit. It’s the most “cultural” entry point, combining spirituality with nature—very Korean.
Ted’s tip: Don’t try to drive to Bukhansan on weekends. Parking fills up by 7 AM, and there’s nowhere legal to put your car by 9 AM. The subway is faster, cheaper, and infinitely less stressful. Plus, at the end of a tough hike, you won’t have the energy to navigate Seoul traffic.
Do You Need a Permit? Registration Requirements
This is one question I get asked constantly, and the answer is both simple and complicated: technically, no regular permit is required for day hikes. However, there are some important exceptions and registration details you need to know.
South Korea has what’s called the “Bukhansan Popular Route Management System.” During peak seasons (roughly April through October, plus weekends year-round), there are capacity limits on the most popular route to Baegundae Peak. If the trail reaches its daily limit (usually around 4,000-5,000 hikers), they’ll close entry after a certain time.
Here’s what you actually need to do:
- For Baegundae Peak (most popular route): Arrive early. The trail doesn’t officially close, but if it’s packed, rangers gently discourage entry after mid-morning on weekends. There’s no online registration system—it’s first-come, first-served. Arrive by 7 AM on weekends to guarantee access.
- For other routes: No restrictions. You can start anytime.
- Overnight mountain hut reservations: These require advance booking through the park office, but I don’t recommend them for Bukhansan (it’s technically a day-hike destination, and overnight stays are in decline).
You don’t need identification or a permit card, but registration kiosks at major entrances have you sign in. This is purely for safety and emergency response—if something happens, they know how many people are on the mountain.
Ted’s tip: If you arrive and the Baegundae route is packed, don’t despair. The eastern routes and Neunggol Valley routes are absolutely stunning and way less crowded. Some of my favorite Bukhansan memories are from routes where I saw maybe 20 people all day.
Best Hiking Trails: Detailed Routes for Every Level
Trail 1: Baegundae Peak – The Classic (Moderate to Difficult)
This is the marquee route, the one everyone wants to do. Baegundae (백운대) literally translates to “white cloud peak,” and on clear days, the name makes sense. From the summit, you can see the entire city—Namsan Tower to the south, the DMZ to the north, and when pollution levels are low (rare, but it happens), the Incheon area to the west.
Distance: 6.8 km round trip (actually closer to 7.5 km with elevation)
Duration: 3.5–4 hours
Difficulty: Moderate to Difficult
Starting point: Gireum Station (기름역)
The route: From Gireum Station, walk to the park entrance and register. The trail starts relatively gentle, following a river valley called Guseonggyeongsa. For the first 1.5 km, it’s almost pleasant—you’ll cross wooden bridges and hear stream water. This is where most tourists are taking photos, so it’s crowded but scenic.
Then things change. At about 1.5 km, the trail becomes a legitimate rock scramble. You’re using your hands. The rocks are smooth from millions of hiking boots, which is actually dangerous—one slip and you’re tumbling down a slope. This section is only about 1 km, but it’s probably the most challenging part of the hike, both physically and mentally. Stay focused. No selfies on the rocks.
Around 3 km, you reach a plateau called Insubong (인수봉), a beautiful granite peak with amazing views. Many hikers stop here and turn back, which is a totally valid choice. The summit is nice, but Insubong is genuinely beautiful and less crowded.
If you continue to Baegundae, it’s another 1 km of moderate ridge hiking. The final push to the peak involves more rock scrambling and some sections with chains bolted into the rock for stability. When you reach the summit, there’s a small shelter and a stone marker. On a clear day, it’s genuinely spectacular. On a smoggy day (common in winter and early spring), you’ll see fog. That’s okay—you did the hike. The achievement isn’t the view; it’s the challenge.
Ted’s tip: Don’t rush the descent. More injuries happen on the way down because people are tired and impatient. Take your time, especially on the rock scramble sections. If the trail is very crowded, consider doing this hike on a weekday. The experience is dramatically different, and you’ll actually enjoy it instead of feeling like you’re in a hiking queue.
Trail 2: Neunggol Valley – The Scenic Route (Easy to Moderate)
If you want beautiful scenery, peaceful vibes, and don’t need to bag a “peak,” Neunggol (능골) is exceptional. This valley is accessed from Suyu Station and feels like you’re in a different park entirely. Streams, rock formations, and shade from dense forest.
Distance: 5.2 km round trip
Duration: 2.5–3 hours
Difficulty: Easy to Moderate
Starting point: Suyu Station (수유역)
From Suyu Station Exit 1, head north about 15 minutes to reach the park entrance. The trail follows a stream valley with minimal elevation gain. It’s genuinely lovely—you’ll see rock formations, small waterfalls (depending on season), and maybe some mountain goats if you’re lucky. The trail terminates at a rock formation called Manggyesan (망경산), where there’s a nice flat area to rest and eat.
What I love about Neunggol is the reversibility. You can turn around anytime and the hike is still complete and satisfying. There’s no pressure to summit anything. It’s hiking for hiking’s sake, which is honestly the best kind.
Ted’s tip: Neunggol is perfect for weekends when you want exercise but don’t want to be crushed by crowds. The trail quality is excellent, and the valley has enough water features to keep it interesting. Bring a good camera—the lighting in this valley is consistently beautiful.
Trail 3: Bibong Peak Ridge – The Advanced Route (Difficult)
For experienced hikers, Bibong (비봉) is where the real mountain experience is. This route involves serious elevation gain, exposed ridges, and rock scrambling that requires actual skill and fitness. It’s not dangerous, but it demands respect.
Distance: 8.5 km round trip
Duration: 4.5–5 hours
Difficulty: Difficult
Starting point: Gireum Station (기름역)
The Bibong route starts similarly to Baegundae but branches east before the main scramble. You’ll ascend through dense forest, gain about 400 meters of elevation, and emerge on a narrow ridge with exposures on both sides. The views are exceptional because there are fewer people—you’re working harder, and most tourists don’t come here.
The final approach to Bibong involves a section called the “iron ladder,” which sounds scary but is just a few bolted steps. From the summit, you can see Baegundae to the west and have a genuine sense of standing on a mountain rather than visiting a hiking trail.
Ted’s tip: Don’t attempt Bibong if you’re afraid of heights or have limited hiking experience. The ridge sections aren’t technically difficult (no rock climbing required), but they’re exposed, and if you panic, that’s a problem. If you’re comfortable with scrambling and have good leg fitness, it’s absolutely doable and incredibly rewarding.
Trail 4: Bullamsa Temple Route – Family Friendly (Easy)
If you’re hiking with family or just want a leisurely morning hike, the Bullamsa Temple route is perfect. It’s the easiest Bukhansan hike and offers cultural interest along with nature.
Distance: 3.5 km round trip
Duration: 1.5–2 hours
Difficulty: Easy
Starting point: Bullamsa Station (불암사역)
From the station, it’s a short walk to Bullamsa Temple, one of Seoul’s oldest temples. The hiking trail ascends gradually alongside temple grounds and small shrines. You’ll see monks, prayer flags, and locals doing tai chi. The endpoint is a small pavilion with views of the northern section of Bukhansan.
This route is perfect for combining culture and nature—something you can’t really do as well at other Bukhansan entrances. It’s also the least crowded of the main routes, which means a more peaceful experience.
Ted’s tip: If you’re interested in Korean Buddhist culture, consider stopping for tea at the temple before or after your hike. Many temples have small tea houses (다실), and sitting with a cup of traditional tea after hiking is genuinely restorative. For deeper exploration, check out my guide to Korean temple experiences.
| Trail Name | Distance | Duration | Difficulty | Nearest Subway | Crowd Level |
|---|---|---|---|---|---|
| Baegundae Peak | 6.8 km | 3.5–4 hrs | Moderate-Difficult | Gireum (Line 1) | Very High |
| Neunggol Valley | 5.2 km | 2.5–3 hrs | Easy-Moderate | Suyu (Line 4) | Low-Medium |
| Bibong Peak Ridge | 8.5 km | 4.5–5 hrs | Difficult | Gireum (Line 1) | Low |
| Bullamsa Temple Route | 3.5 km | 1.5–2 hrs | Easy | Bullamsa (Line 3) | Low |
What to Pack: The Essentials
Over 35 years, I’ve learned that what you bring makes the difference between a great hike and a miserable one. Here’s exactly what you need:
| Item | Why It Matters | Budget Estimate |
|---|---|---|
| Good hiking boots | Rock scramble sections are slippery. Jeans are not boots. | ₩150,000–300,000 |
| Water bottle (1.5L minimum) | Hydration is critical. Streams exist but aren’t guaranteed. | ₩15,000–40,000 |
| Sunscreen (SPF 30+) | UV exposure at altitude is intense. Korean sun is no joke. | ₩8,000–20,000 |
| Backpack (20–30L) | Distributes weight; frees your hands for scrambling. | ₩80,000–200,000 |
| Snacks (energy bars, fruit) | Fuel your body. You’ll burn 1,000+ calories. | ₩10,000–20,000 |
| Insect repellent | Mosquitoes in summer can be vicious. | ₩5,000–15,000 |
| Trekking poles | Reduce knee impact on descent. Especially helpful for 4+ hour hikes. | ₩50,000–150,000 |
| Phone (fully charged) | Emergency calls. Trails have cell service. | Already in your pocket |
Where to buy gear in Seoul:
- Decathlon (디카톤): Budget-friendly Korean outdoor brand. Locations everywhere. Great for basics—water bottles, backpacks, poles. Website: decathlon.co.kr
- The Face Shop Outdoor: Higher-end gear. Multiple Seoul locations. Good for hiking boots and technical clothing.
- Online via Naver or Coupang: If you’re already in Korea, you can order hiking gear with next-day delivery for about ₩10,000–20,000.
Ted’s tip: Don’t hike in cotton clothing. Wear moisture-wicking synthetics or merino wool. Cotton absorbs sweat, gets heavy, and can cause chafing. This is non-negotiable, even for casual day hikes. Korean outdoor shops have excellent technical clothing that won’t break the bank.
Best Seasons and Weather Considerations
Spring (April–May): The Comfortable Sweet Spot
Spring is genuinely the best time to hike Bukhansan. Temperatures are 15–20°C, wildflowers are blooming, and the air is fresh. The only downside is that everyone knows this, so trails are crowded. But the experience is so good, it’s worth dealing with the crowds.
April is slightly less busy than May, and the wildflowers (especially azaleas) are spectacular. I’ve hiked this trail 100+ times, and spring mornings at Bukhansan are still capable of surprising me.
Summer (June–August): Hot and Humid
Summer hiking here is doable but challenging. Temperatures reach 28–32°C, humidity is oppressive, and the forest canopy actually helps—you’re shaded, which makes a difference. The stream valleys are cool and refreshing. Start very early (by 6 AM) to avoid midday heat, and bring extra water.
Also, in July-August, there are occasional heavy rains. Flash flooding can happen, especially in valley trails. Check weather forecasts before going. Bring a lightweight rain jacket.
Autumn (September–November): Peak Season (Literally)
This is when Bukhansan is absolutely mobbed. The foliage is stunning—reds, oranges, golds lighting up the ridge. Temperatures are perfect (10–18°C). But you’ll share the trail with thousands of others. If you go, arrive extremely early. Like, take the first subway train early.
For full details on autumn foliage in Korea, including Bukhansan’s best colors timeline, check my Korean autumn foliage guide.
Winter (December–February): Beautiful But Dangerous
Snow-covered Bukhansan is visually stunning. The bare branches, white peaks, and crystalline air create postcard-worthy scenes. But the trails are icy and treacherous. Rockfaces become skating rinks. The rock scramble sections of Baegundae in winter require microspikes or crampons, which most casual hikers don’t have.
I don’t recommend Bukhansan for winter hiking unless you have serious mountain experience and proper equipment. There are plenty of easier winter hikes in the Seoul area if you want snow scenes.
| Season | Temperature | Crowd Level | Best Trail | Recommendation |
|---|---|---|---|---|
| Spring (Apr–May) | 15–20°C | High | Any (wildflowers) | ★★★★★ |
| Summer (Jun–Aug) | 28–32°C | Medium | Valley routes | ★★★ |
| Autumn (Sep–Nov) | 10–18°C | Very High | Any (foliage) | ★★★★★ (crowded) |
| Winter (Dec–Feb) | -5 to 5°C | Low | None (icy) | ★★ (risky) |
Food and Drinks: Where to Refuel
After hiking Bukhansan, you’ll be hungry. The question is: where do you eat? Here are your best options:
Gireum Station Area (Most Popular)
The streets around Gireum Station are lined with restaurants catering specifically to hikers. You’ll find:
- Korean soup houses (탕 집): After a hike, a hot bowl of samgyetang (ginseng chicken soup) or doenjang jjigae (fermented soybean stew) is deeply satisfying. Expect ₩10,000–15,000.
- Kalbi grilled restaurants: If you want meat, galbi (grilled short ribs) are excellent here. Pair with cold beer. ₩35,000–50,000 for a meal.
- Convenience stores (GS25, CU): There are several near the park entrance. Grab triangle kimbap, coffee, and snacks before/after your hike.
Specific recommendation: There’s a small restaurant about 100 meters from Gireum Station called “Hakbat Guksu” (학밭국수). They make incredible sujebi (hand-torn noodle soup) for ₩9,000. It’s a local favorite, not fancy, but genuinely delicious after hiking. Look for the small green sign.
Suyu Station Area
Suyu is slightly quieter and has some excellent Korean-style restaurants. Look for dakgangjeong (sweet and spicy chicken) restaurants, which are common and cheap (₩8,000–12,000).
Ted’s tip: Don’t eat huge portions immediately after finishing. Your stomach is still recovering. Eat something light first (broth, rice), rest for 20 minutes, then have your main meal. This prevents digestive discomfort and actually helps with recovery.
Safety Tips and What to Watch Out For
Bukhansan is generally very safe, but there are hazards specific to the mountain:
- Rock scramble sections: Wear proper boots. The rocks are smooth and slippery. One slip doesn’t necessarily mean a fall down the entire mountain, but it can cause injuries. Take your time.
- Dehydration: At altitude, even cool days can cause dehydration. Drink water regularly, not just when you’re thirsty.
- Getting lost: Main trails are extremely well-marked with painted blazes and signs. It’s nearly impossible to get lost. But if you deviate to smaller side paths, things get confusing fast. Stick to main routes.
- Sudden weather changes: Summer afternoon thunderstorms can materialize quickly. If you see lightning, get off exposed ridges immediately and descend to lower elevation.
- Other hikers: On crowded days, watch out for rushing hikers. Some people treat the mountain like a fitness race. Don’t be pushed by their pace. Hiking shouldn’t be competitive.
- Mountain goats: Yes, there are wild mountain goats (고라니) on Bukhansan. They’re harmless and shy. If you see one, that’s actually a cool moment—leave them alone and enjoy it.
Emergency contact: If something goes wrong, call 119 (Korean emergency number). Cell service is available on the main trails. Rangers can reach your location quickly because the trail system is well-documented.
Ted’s tip: Tell someone where you’re going and when you expect to return. It doesn’t have to be dramatic—just a text to a friend saying “Hiking Bukhansan today, back by 5 PM.” If you have a problem and don’t check in, people know where to look for you.
Hiking Etiquette and Park Rules
Bukhansan is beloved by Koreans, and the park rules reflect a culture of respect and conservation. Here’s what you need to know:
| Rule | Why It Matters |
|---|---|
| Stay on marked trails | Prevents erosion and protects vegetation. Off-trail hiking damages the ecosystem. |
| No loud music or speakers | Respect other hikers and wildlife. Earbuds are fine; Bluetooth speakers are not. |
| Pack out all trash | Including peels, wrappers, and bags. Leave nothing behind. |
| No open fires or grills | Fire risk in summer. Designated picnic areas exist near entrances only. |
| No picking plants or disturbing animals | This is a nature reserve. Wildflowers are protected. |
One thing I’ve noticed over 35 years is that the hiking culture here is very group-oriented. Older Korean hikers often go in organized clubs, they chat, they’re social. But they’re also incredibly respectful of the mountain. There’s an unspoken understanding that you’re guests in nature, not conquerors of it.
Ted’s tip: If you encounter an elderly Korean hiker on the trail, they might offer you homemade snacks or water. This is genuine kindness, not a scam. Accept graciously. It’s a beautiful part of hiking culture here.
Combining Bukhansan with Other Seoul Activities
Bukhansan is in northern Seoul, so it’s easy to combine with other activities:
- Before hiking: Have a traditional Korean breakfast at a local market. Check my guide to Korean breakfasts for where to eat like a local.
- After hiking: Head to nearby Insadong or Bukchon Hanok Village (both south of the mountain) for cultural exploration. See my Bukchon guide for details.
- Evening activity: Visit a Korean spa/jjimjilbang to soak your sore muscles. Check my jjimjilbang guide for how to do it properly.
Sample day itinerary: 6:30 AM – Quick coffee and toast near station → 7:00 AM – Start hiking → 11:30 AM – Summit, rest 20 minutes → 1:30 PM – Finish hike, change clothes → 2:00 PM – Lunch near Gireum Station → 4:00 PM – Subway to Myeongdong for shopping (15 min from Gireum) → 7:00 PM – Dinner → 9:00 PM – Return to hotel.
Frequently Asked Questions
How long does it take to hike Bukhansan’s main peak?
The Baegundae Peak hike takes 3.5 to 4 hours round trip, depending on fitness level and crowd congestion. The distance is 6.8 km, but elevation gain makes it feel longer. If you’re very fit and the trail isn’t crowded, you can do it in 3 hours. If you’re hiking at a comfortable pace and stopping for photos, plan 4–4.5 hours.
Is Bukhansan difficult for beginners?
It depends on which route you choose. The Baegundae Peak route is moderate to difficult—the rock scramble sections require balance and comfort with heights. For true beginners, I recommend starting with the Bullamsa Temple route (very easy) or Neunggol Valley (easy-moderate). Once you’ve done those, you’ll have a better sense of your fitness level and can tackle Baegundae confidently.
Do I need hiking poles?
Not required, but highly recommended, especially for the descent. Trekking poles reduce impact on your knees (crucial after 4 hours of hiking) and provide stability on rocky sections. For longer hikes (4+ hours), poles are genuinely helpful. For shorter hikes (under 3 hours), they’re optional.
What’s the best time of day to start?
Weekday mornings by 8–9 AM are ideal. You’ll have quiet trail and still finish by early afternoon. Weekends? Arrive by 7 AM if you want Baegundae without massive crowds. Starting after 10 AM on weekends is risky—you might find the trail uncomfortably packed.
Are there restrooms on the trails?
There are restrooms at the main entrances (Gireum, Suyu, Bullamsa). Once you’re on the trail, there are no facilities. Plan accordingly and bring extra water. Longer hikes can take 4+ hours, so choose your entry time wisely.
Can I hike Bukhansan in winter?
Technically yes, but I don’t recommend it for casual hikers. Trails become icy, especially on north-facing slopes and rock scramble sections. If you want a winter hike near Seoul, consider easier alternatives like Namsan or trails on the south side of the mountain where there’s more sun exposure.
What should I do if I twist my ankle?
Stop, rest, and evaluate. Can you walk? If no or if there’s significant swelling, call 119 (emergency). Rangers can reach most locations on Bukhansan within 30–45 minutes. There’s no shame in calling for help—that’s what the system is for. If you can hobble, descend slowly and carefully. Go downhill first (faster descent with injured ankle) before tackling flat sections.
Are there any water sources on the trail?
The trails follow valleys with streams, and there are several water access points, especially on the Neunggol route. However, drinking untreated mountain water is risky. Bring your own water. If you absolutely must drink from a stream, take from fast-flowing sections (not stagnant pools) and accept some risk. Better to bring 2 liters from the start.
Final Thoughts
I’ve been hiking Bukhansan for 35 years, and I’m still discovering new things about this mountain. Last spring, I found a cluster of rare wild orchids in a hidden valley I’d walked past a hundred times. The mountain keeps itself interesting.
What I love most about Bukhansan is that it’s accessible without being trivial. Anyone with reasonable fitness can reach Baegundae Peak. You don’t need special equipment or heroic endurance. But you do need to respect the mountain, prepare properly, and understand your own limitations. That balance—between welcome accessibility and genuine mountain challenge—is what makes Bukhansan special.
If you’re visiting Seoul, spend at least a few hours on Bukhansan. If you’re living in Seoul, make this your regular weekend ritual. In 35 years, I’ve done this hike in every season, every weather condition, and with people from every corner of the world. Each time, the mountain teaches me something new.
The views, the fresh air, the physical challenge, the sense of escaping the city while still being so close to it—these are gifts that Bukhansan offers freely. You just have to show up early, wear good boots, and be willing to work a little.
— Ted K
Image Credits: Photos sourced from Unsplash. By using this site, you agree to our Privacy Policy and Disclaimer.